- Aug 30 Sat 2014 12:02
-
Android 利用 addView 讓 Activity 動態加入多個 View 物件

- Aug 30 Sat 2014 10:17
-
Android 元件佈局 RelativeLayout
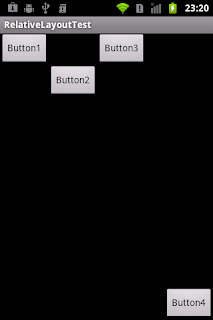
上一篇介紹過如何使用LinearLayout進行元件佈局,但是單靠一種排版方式,設計出來的介面並不豐富,所以Android也有提供其它的排版方式,本篇將介紹如何使用RelativeLayout(相對佈局)進行排版。其它的排版方式會陸陸續續的介紹!!
使用RelativeLayout進行元件佈局
- Aug 30 Sat 2014 10:14
-
[Android UI 設計] 版面布局Layout-LinearLayout

每一個人第一次接觸到Android UI 設計時,第一個認識的ViewGroup應該都是LinearLayout,因為eclipse自動新增的專案預設就是以「android.widget.LinearLayout 」為主要的版面布局。
LinearLayout是以你設定它的「android:orientation」屬性;值有:垂直(vertical)或水平(horizontal)兩種,用來排列所有的子元件。所有的子元件都被線性堆放在其它元素之後,因此一個設定垂直屬性的每一列只會有一個元件一直向下排列,而不管他們有多寬;而一個設定水平屬性的每一行只有一個元件一直向右排列(高度為最高子元件的高度加上邊框高度)。LinearLayout保持子元件之間的間隔以及互相對齊。
LinearLayout常用屬性
屬性名稱
描述
LinearLayout佈局的方向,可取horizontal(水平)和vertical(垂直)兩種排列方式
內部元件對於父元件的對齊方式
元件的分配大小的權值,數字越大分配越多
1 2 3 4 5 6 7 8 9 10 11 12 13 14 15 16 17 18 19 20 21 22 23 24 25 26 27 28 29 30 31 32 33 34 35 36 37 38 39 40 41 42 43 44 45 46 47 48 49 50 51 52 53 54 55 56 57 58 59 60 61 62 63 64 65 66 67 68 69 70 71 72 73 74 75 76 77 78 79 80 81 82 83 84 85 86 87 | android:layout_width="match_parent" android:layout_height="match_parent" android:background="#ff0" android:orientation="vertical" > <Button android:id="@+id/Button15" android:layout_width="wrap_content" android:layout_height="wrap_content" android:layout_gravity="left" android:text="靠左" /> <Button android:id="@+id/Button02" android:layout_width="wrap_content" android:layout_height="wrap_content" android:layout_marginLeft="30dp" android:text="離左邊界30dp" /> <Button android:id="@+id/Button01" android:layout_width="wrap_content" android:layout_height="wrap_content" android:layout_gravity="right" android:text="靠右" /> <Button android:id="@+id/Button03" android:layout_width="wrap_content" android:layout_height="wrap_content" android:layout_gravity="center_horizontal" android:text="置中" /> <LinearLayout android:layout_width="wrap_content" android:layout_height="match_parent" android:background="#cc0" android:orientation="horizontal" > <Button android:id="@+id/Button14" android:layout_width="wrap_content" android:layout_height="wrap_content" android:text="Button" /> <Button android:id="@+id/button2" android:layout_width="wrap_content" android:layout_height="wrap_content" android:text="Button" /> <Button android:id="@+id/Button11" android:layout_width="wrap_content" android:layout_height="80dp" android:text="以我為列高" /> <LinearLayout android:layout_width="100dp" android:layout_height="match_parent" android:background="#f0f" android:orientation="vertical" > <Button android:id="@+id/button1" android:layout_width="wrap_content" android:layout_height="wrap_content" android:text="Button" /> <Button android:id="@+id/Button16" android:layout_width="wrap_content" android:layout_height="wrap_content" android:text="Button" /> <Button android:id="@+id/Button17" android:layout_width="wrap_content" android:layout_height="wrap_content" android:text="Button" /> </LinearLayout> </LinearLayout></LinearLayout> |
- Aug 30 Sat 2014 08:33
-
Android 從媒體櫃Gallery 選擇圖片
To fetch images on SD Card.Uri will be
android.provider.MediaStore.Images.Media.EXTERNAL_CONTENT_URI
onActivityResult method:
protectedvoid onActivityResult(int requestCode,int resultCode,Intent intent)
{super.onActivityResult(requestCode, resultCode, intent);
if(resultCode == RESULT_OK)
{
Uri photoUri = intent.getData();
if(photoUri !=null)
{
try
{Bitmap bitmap =MediaStore.Images.Media.getBitmap(this.getContentResolver(), photoUri);
//Now you can upload this bitmap to server or do something else.
}catch(Exception e)
{
e.printStackTrace();
}
}
}
}
- Aug 29 Fri 2014 22:18
-
Android 畫面加上捲軸 ScrollView
若Activity中的內容太多,或是ListView的項目超過畫面 可以在Activity加上捲軸
畫面上方加上
<ScrollView xmlns:android="http://schemas.android.com/apk/res/android"
android:layout_width="fill_parent" android:layout_height="fill_parent" >
畫面上方加上
<ScrollView xmlns:android="http://schemas.android.com/apk/res/android"
android:layout_width="fill_parent" android:layout_height="fill_parent" >
- Aug 29 Fri 2014 22:08
-
Java Android Bitmap 圖片縮放
Bitmap b =BitmapFactory.decodeByteArray(imageAsBytes,0, imageAsBytes.length)
profileImage.setImageBitmap(Bitmap.createScaledBitmap(b,120,120,false));
profileImage.setImageBitmap(Bitmap.createScaledBitmap(b,120,120,false));
- Aug 29 Fri 2014 22:07
-
Android 簡易Button事件處理

按鈕在許多windows視窗應用程式中,是最常見的「控制項controls」,然而由按鈕所觸發的事件處理,稱之為Even Handler,只不過在android的世界裡,按鈕事件是由系統的Button.onClickListener所控制。
- Aug 28 Thu 2014 07:28
-
Android Button imagebutton 背景透明或半透明
半透明<Button android:background="#e0000000" ... />
透明<Button android:background="#00000000" ... />
透明<Button android:background="#00000000" ... />
- Aug 27 Wed 2014 17:55
-
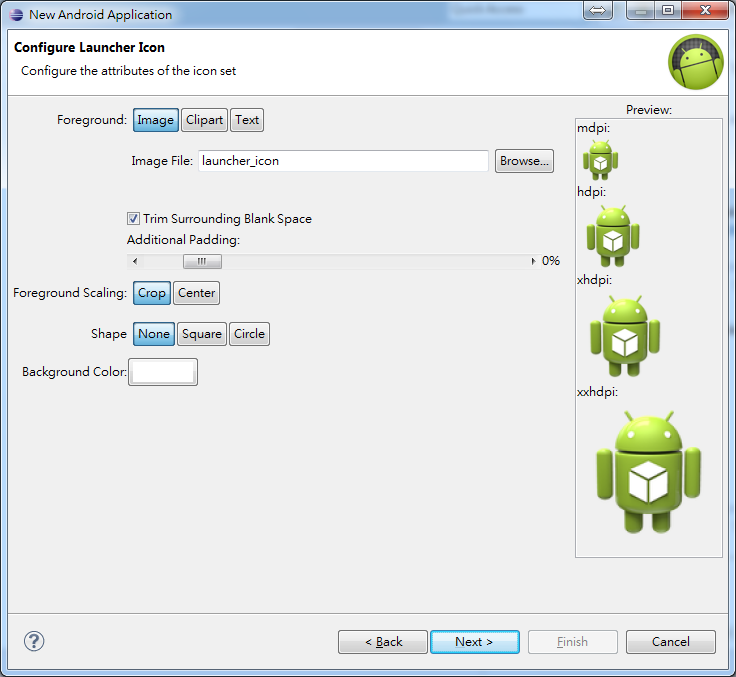
在Eclipse中重新設定Android應用程式啟動圖示Launcher Icon
- Aug 27 Wed 2014 14:07
-
ActionBar Home 圖標區 返回鍵

ActionBar在Android 3.0 SDK中為平板引入,在4.0中也可以在phone中使用。在title中提供類似tab和菜單的效果,有三種形式:Tabbed action bar,list action bar和standard action bar,我們將在小例子中進行示範。
Home Icon
在Action Bar的最左邊,就是Home icon和標題的區域,如上圖紅圈內。在Home icon的左邊有一個返回的的左箭頭,通常我們點擊這個區域,將回到應用的主activity中。圖中的activity是通過主activity的菜單觸發,之前已經多次使用,不在重複。activity的layout很簡單,只有一個textview在LinearLayout中,其代碼如下:
- Aug 26 Tue 2014 08:24
-
android ui的幾個概念:px,dip(dp),sp,dpi,分辨率等
1.px (pixels)像素 – 是像素,就是屏幕上實際的像素點單位。
dip或dp (device independent pixels)設備獨立像素, 與設備屏幕有關。
sp (scaled pixels — best for text size):類似dp, 主要處理字體的大小。
dpi(dot per inch):屏幕像素密度,每英吋多少像素
dip或dp (device independent pixels)設備獨立像素, 與設備屏幕有關。
sp (scaled pixels — best for text size):類似dp, 主要處理字體的大小。
dpi(dot per inch):屏幕像素密度,每英吋多少像素
- Aug 26 Tue 2014 08:22
-
Android 將 Bitmap 轉為指定格式圖片並儲存至 SDCard
以下程式碼將示範如何將Bitmap轉為指定格式的圖片並儲存至外部儲存裝置SDCard。
若要寫入SDCard,必須先將寫入外部儲存裝置的權限打開,於Android專案的AndroidMaifest.xml中加入以下敘述。
<uses-permission android:name="android.permission.WRITE_EXTERNAL_STORAGE" />
若要寫入SDCard,必須先將寫入外部儲存裝置的權限打開,於Android專案的AndroidMaifest.xml中加入以下敘述。
<uses-permission android:name="android.permission.WRITE_EXTERNAL_STORAGE" />